Saturday, January 29, 2011


Wednesday, January 26, 2011
Michelin Star - What is the difference?

What is so special about a Michelin star chef? The cook at the local restaurant can cook without being rated by a Michelin Star! Read on to know if they really need to be marked or the star is just a media bubble.
So what is so different? Is it about small quantity and high prices, names in European lingua? Is it about the ambience or the presentation of food? All these questions get answered when one has the privilege to taste the food created and I repeat ‘created’ by chef Igor Macchio.
 Igor Macchio is a chef who runs an eatery in Italy called “La Credenza”. Chef Igor has been rated with a single Michelin Star which means that La Credenza is the best in its category of food creators of Italian food. This also means that Chef Igor caters to anonymous inspectors about 6 times a year and successfully assures them that his title of Michelin star is the basis of subjective and critical acclaim.
If not in Italy where can one taste the best Italian cuisine from a Michelin star chef?
Vetro – The Oberoi (Left on the lobby) has a round door, which I thought was unique and confusing for a new visitor; because the glass and wooden door is completely spotless. Vetro means “glass” in Italian personifying its allegiance.
The restaurant is designed to exploit natural lighting using a curtain of coloured glass. The interior designer obviously made a killing on creating lines of glass holders and filled them with randomly coloured glass (probably left over from a previous job) which lacks imagination. I would not speak much of the décor, as it only reminds me of the lounges in an international airport. However, there is a little corner that contains a wine library and wine tasting table that is perfect for a group session adorned with some of the finest Italian wines.
The restaurant is designed to exploit natural lighting using a curtain of coloured glass. The interior designer obviously made a killing on creating lines of glass holders and filled them with randomly coloured glass (probably left over from a previous job) which lacks imagination. I would not speak much of the décor, as it only reminds me of the lounges in an international airport. However, there is a little corner that contains a wine library and wine tasting table that is perfect for a group session adorned with some of the finest Italian wines.

I walked straight into the clean and organized kitchen where Chef Igor was in the process of creating a lamb marinated in Xanata coffee and served with sweet corn sauce garnished with cress. If you can digest the real name for the dish, “Agnello marinato al caffe’ con ragu’ di mais dolce e germogli lamb marinated in coffee, sweet corn ragout and aromatic cress.”


The taste of melting pumpkin ravioli is so different from the ingredients in solitary albeit precatory, cuts your interest in the world around you while you digest each sense on your face. Some of the recipes are more than 24 hours in preparation time to serve up quarter of a plate of mind watering taste, aroma and experience. For instance the fine risotto topped with a swirl of anchovies.

The staff at the Vetro comprehends Italian cuisine and aspire to learn more. They work in the background interacting with you in the most subtle manner to make sure that you need not lift hand or open mouth for service. The air-conditioning keeps you comfortable shielding the sun’s heat rays.
The Mumbai based Nariman Point restaurant has all the requirements that an Italian restaurant may require. A perfect destination for Chef Igor through his world tour promoting his piedmont style promising cuisine of exceptional quality. Chef Igor does not use garlic unlike most Italian chefs and yet has a clear understanding of why certain things are done the way they are. He explains, “We always puts the dra-ssing on the top and the sauce at the bot-tom as the garnish may lose frashn-ass as the sauce may bees hotz!” The whole process of cooking is about precise measurements and precise ingredients and combinations, to make sure that food is tasted in perspective of the right combination.

I believe that such hard work and precision can only come with substantial skill and experience and deserves a star rating which is done with equal diligence. Vetro is worth a visit not just by Michelin Star chefs but also Italian savouring audience. Are you one of them?
Tuesday, January 25, 2011
Arusuvai Chain Season 2: Sauteed Mushroom

Arusuvai is a beautiful friendship chain to bring together blogger and non blogger. A secret ingredient is mailed and all you have to do is create a dish from it. This was originally started by Bharathy of Spicy Chilly, Srivalli of Cooking 4 all seasons and Lathamma of The Yum Blog. Now the second season is organised by Sayantani of A Homemaker's Diary.

I received my first secret ingredient from Divya Kudua of Easy Cooking. Along with the ingredient; I also received a hand-written letter and a book - Dessert Puddings by Nita Mehta.Frankly, I've never used this ingredient nor did I know the name of it.I had a hunch that it was used in preparation of rice items like biryani or pilaf but I wasn't sure. I googled first for garam massala and tried to match the image with the ingredient and finally I found that it's called 'Star Anise'.

Star anise is the almost ripe, dried, star-shaped multiple fruit of the star anise tree (Illicium verum), which is a member of the magnolia family (Magnoliaceae). The small, red-brown, star-shaped fruits contain 6 - 8 unevenly sized, boat-shaped individual fruits 12 - 17 mm in length, each containing a glossy brown, egg-shaped seed. It has a more powerful, pungent and strong flavour when compared to other spices.Whole stars can be used as such or they can be grounded as well. A note to keep in mind, because of its powerful flavour, only small amounts are used.This spice is widely used in Chinese cuisine, and to a lesser degree in South Asia and Indonesia.
This is my first experience with the spice and I wanted to use it in a completely different manner. Star anise is commonly used in Indian rice or curry and it can also be used in baking or in flavouring fruit salads.

250gms of button mushroom, cleaned and cut into cubes
2 nos star anise
2tsp olive oil
2tsp minced garlic
1stp ground pepper
1/2tsp chilli flakes
salt to taste
Fresh parsley, finely chopped for garnish
Heat oil in a pan and add star anise. Allow it to change it's colour to blackish brown and add garlic. Let the garlic turn a little brownish and crisp, I like garlic nice and crispy; if you don't like yours brown or crispy then let it cook only for 30seconds. Add mushrooms, salt, pepper and chilli flakes. Cook on medium flame until the water has evaporated and the mushrooms are cooked.Switch off the stove and garnish with fresh parsley. Serve hot as a side with anything you like! Serves 2.

My tastebuds: I found the flavouring too strong and different from the usual.
The chain of friendship continues and I will be sending secret ingredients to Veena of Kitchen Celebrations and Vidya of The Black Ladle.
Saturday, January 15, 2011
English Winter Soup
It's winter time, well technically in Mumbai too.... It's pleasant and the best part is that a you don't have to cover yourslef up from top to bottom. December and January are the only two graceful months of pleasant weather in contrast to the humidity.
Winter is also the time for some delicious soups and it is the best way to hydrate yourself too. I found this recipe here and liked it instantly. The soup is a meal by itself and one bowl can really fill you up!

1/2 cup arborio rice
1tbs olive oil
2 medium sized potatoes, sliced
1cup fresh or frozen peas
2tsp crushed garlic
1tsp nutmeg
2tbs finely chopped parsley
4cups water or broth
salt & pepper to taste
2 hard-boiled eggs (optional)
Heat some oil in a skillet, and roast the rice until gloden brown; this will help the rice to cook faster and give it a nice nutty flavour too. Keep aside.
Heat oil in a pot and add crushed gralic, cook for about a minute and let it not turn brown. Add potatoes and allow it cook for a minute. Add parsely and mix well. Now add rice, peas, nutmeg, water or broth and salt and pepper to taste. Bring the soup to a boil and then simmer the stove to medium and cook for 15 minutes. Serve hot with toast or egg or both. Serves 2.


This is my submission to this month's No Croutons Required - Rice, hosted by Lisa's Kitchen, to Souper Sundays, hosted by Kahakai Kitchen, to Soup Recipes, hosted by My Culinary Creations and to Winter Warmers, hosted by The Veggie Hut.

Winter is also the time for some delicious soups and it is the best way to hydrate yourself too. I found this recipe here and liked it instantly. The soup is a meal by itself and one bowl can really fill you up!

1/2 cup arborio rice
1tbs olive oil
2 medium sized potatoes, sliced
1cup fresh or frozen peas
2tsp crushed garlic
1tsp nutmeg
2tbs finely chopped parsley
4cups water or broth
salt & pepper to taste
2 hard-boiled eggs (optional)
Heat some oil in a skillet, and roast the rice until gloden brown; this will help the rice to cook faster and give it a nice nutty flavour too. Keep aside.
Heat oil in a pot and add crushed gralic, cook for about a minute and let it not turn brown. Add potatoes and allow it cook for a minute. Add parsely and mix well. Now add rice, peas, nutmeg, water or broth and salt and pepper to taste. Bring the soup to a boil and then simmer the stove to medium and cook for 15 minutes. Serve hot with toast or egg or both. Serves 2.


This is my submission to this month's No Croutons Required - Rice, hosted by Lisa's Kitchen, to Souper Sundays, hosted by Kahakai Kitchen, to Soup Recipes, hosted by My Culinary Creations and to Winter Warmers, hosted by The Veggie Hut.

Friday, January 14, 2011
Asparagus,Mint & Lemon Risotto
This post has been a long overdue and for some reason I almost forgot about it.....The Risotto is inspired by Jamie Oliver and it's my first time to try out any of his recipes and I'm glad I did.
To get fresh asparagus in India is a rare thing and I happen to pick them at the Farmer's Market; fresh, green and also organic.The method for cooking risotto is almost the same as my previous post Yellow & Red Pepper Risotto apart from the flavouring ofcourse...

1 cup arborio rice
1 cup fresh or canned asparagus, cut into desired length
1cup finely chopped onion
2 garlic clove, minced
1 tbs butter
1tbs olive oil
5 cups vegetable broth (or chicken broth)
1/4 cup white wine (optional)
salt & pepper to taste
1/4 cup parmesan cheese (can add more if you like)
2tbs fresh mint leaves
1tbs lemon zest
In the cleaned skillet cook onions in 1tbs remaining butter over moderate heat, stirring until turned light brown, add garlic and onions, cook until soft. If using fresh asparagus, pre boil or if using canned; add them into the skillet and season with salt and pepper.Keep aside
In a saucepan heat broth and keep at a bare simmer or microwave.
Take a non-stick pan (chances of burning the rice is lesser),add olive oil and keep stirring dry rice for several minutes in the oil over medium-high heat until it is golden, but not burnt. This also helps the rice to release the starch later on, and creates a nice nutty flavour.
Add wine and cook, stirring constantly, until wine is absorbed.If you are not using wine; you can start adding broth.Add about 1/2 cup simmering broth and cook, stirring constantly, until broth is absorbed.
Continue adding broth, about 1/2 cup at a time, and cooking, stirring constantly and letting each addition be absorbed before adding the next, until rice is 'al dente', about 20 minutes.
Remove pan from heat and stir in the prepared mixture of onion and asparagus , parmesan cheese, mint, lemon zest,salt and pepper to taste.Serves 2.

My tastebuds: the mint and lemon gives risotto a different and a tangy flavour. I didn't like the lemon too much and felt that the flavouring was not complete.
This is my submission to this week's Weekend Herb Blogging, hosted by Cindystar.
To get fresh asparagus in India is a rare thing and I happen to pick them at the Farmer's Market; fresh, green and also organic.The method for cooking risotto is almost the same as my previous post Yellow & Red Pepper Risotto apart from the flavouring ofcourse...

1 cup arborio rice
1 cup fresh or canned asparagus, cut into desired length
1cup finely chopped onion
2 garlic clove, minced
1 tbs butter
1tbs olive oil
5 cups vegetable broth (or chicken broth)
1/4 cup white wine (optional)
salt & pepper to taste
1/4 cup parmesan cheese (can add more if you like)
2tbs fresh mint leaves
1tbs lemon zest
In the cleaned skillet cook onions in 1tbs remaining butter over moderate heat, stirring until turned light brown, add garlic and onions, cook until soft. If using fresh asparagus, pre boil or if using canned; add them into the skillet and season with salt and pepper.Keep aside
In a saucepan heat broth and keep at a bare simmer or microwave.
Take a non-stick pan (chances of burning the rice is lesser),add olive oil and keep stirring dry rice for several minutes in the oil over medium-high heat until it is golden, but not burnt. This also helps the rice to release the starch later on, and creates a nice nutty flavour.
Add wine and cook, stirring constantly, until wine is absorbed.If you are not using wine; you can start adding broth.Add about 1/2 cup simmering broth and cook, stirring constantly, until broth is absorbed.
Continue adding broth, about 1/2 cup at a time, and cooking, stirring constantly and letting each addition be absorbed before adding the next, until rice is 'al dente', about 20 minutes.
Remove pan from heat and stir in the prepared mixture of onion and asparagus , parmesan cheese, mint, lemon zest,salt and pepper to taste.Serves 2.

My tastebuds: the mint and lemon gives risotto a different and a tangy flavour. I didn't like the lemon too much and felt that the flavouring was not complete.
This is my submission to this week's Weekend Herb Blogging, hosted by Cindystar.
Wednesday, January 12, 2011
A good 2010 and some yam fritters...
It's been four months of blogging and I really feel like I belong to the food blogging community. I always look forward to your comments, which are a source of encouragement. 2010 was a good start and I look forward to this coming year with a lot more blogging :)
We all love snacking and for some reason we enjoy the fried ones much better than the oil-free ones. I've always enjoyed yam deep-fried and like other roots it fails to give a good taste when consumed just boiled. Yam fritters are good evening snack or can be even eaten as a side-dish along with your main-course.

10 medium sized yams cleaned, boiled & skin removed
oil for frying
for dry massala
1tsp chilli powder
1tsp amchur powder
salt to taste

Flatten all the boiled yam with your palm. Deep fry the flattened yam and serve hot sprinkled with the prepared dry massala.You can also use chat massala instead of the dry massala.
You might like to know: Choose yams that are firm and do not have any cracks, bruises or soft spots. Avoid those that are displayed in the refrigerated section of the produce department since cold temperature negatively alters their taste.
Yams should be stored in a cool, dark and well-ventilated place where they will keep fresh for up to ten days. They should be stored loose and not kept in a plastic bag.
(Source: WH foods)
This is my submission to this month's Deep Fried Snacks, hosted by Tickling Palates.
We all love snacking and for some reason we enjoy the fried ones much better than the oil-free ones. I've always enjoyed yam deep-fried and like other roots it fails to give a good taste when consumed just boiled. Yam fritters are good evening snack or can be even eaten as a side-dish along with your main-course.

10 medium sized yams cleaned, boiled & skin removed
oil for frying
for dry massala
1tsp chilli powder
1tsp amchur powder
salt to taste

Flatten all the boiled yam with your palm. Deep fry the flattened yam and serve hot sprinkled with the prepared dry massala.You can also use chat massala instead of the dry massala.
You might like to know: Choose yams that are firm and do not have any cracks, bruises or soft spots. Avoid those that are displayed in the refrigerated section of the produce department since cold temperature negatively alters their taste.
Yams should be stored in a cool, dark and well-ventilated place where they will keep fresh for up to ten days. They should be stored loose and not kept in a plastic bag.
(Source: WH foods)
This is my submission to this month's Deep Fried Snacks, hosted by Tickling Palates.
Thursday, December 23, 2010
Namaste says Santa & a double treat!!!
Warning: This is going to be a long read, so please stock up your coffee & cookies.....
Santa greeted me first by saying Namaste, when I visited him in 2009 in Rovaniemi (Finland), Santa's official address. The Santa park has it's own post office from where you can post greetings to your loved ones sitting anywhere in the world. Rovaniemi is the land of reindeer and yes I got to try out reindeer meat with wild berries and I know I sound like a carnivore now....
This Christmas, I'm remembering my wonderful holiday and would like to share some of my happy times!



I'm heading home for this holiday season to Bangalore and looking forward to some travelling and exploring new recipes.Since it's Christmas time and you would want to gift some cookies, cakes or nibbles and I have come up with two easy to make recipes that would be easy to pack and can last up to a week even without refrigerating. So here it goes...

Sesame Chikki (Til ke Chikki)
4cups of sugar
1cup hulled sesame seeds
1tsp lemon juice
2tsp cardamon powder
Heat sugar in a pan and just when it's melted and before it's crystallizes, add lime.Once the sugar is fully melted, add sesame seeds, cardamon powder and turn of the gas. Mix well. Grease back of a plate or tray and spread the prepared mixture while hot. Allow it to set for an hour. After an hour, you will be
able to break the pieces easily. Break them into desired sizes and store them in an air tight container. I got about 30-35 medium sized pieces.

Sesame & Chocolate Balls
2cups hulled sesame seeds
1cup dessicated coconut
4tbs butter/ghee
1/2 cup honey
2tsp cardamon powder
1tbs raisins
1tbs cashew
50gms dark chocolate

Mix all the dry ingredients except for the chocolate in a bowl and mix well. Make small balls and keep them aside. Melt the chocolate in a bowl (microwave it) and dip the balls one by one, until it is fully covered with chocolate. I prefer to have a thin layer of chocolate rather than thick one. Allow it to dry and refrigerate for an hour. Store them in airtight containers either at room temperature for a week or refrigerate until they can last. I got about 25 pieces.

My tastebuds: I've had sesame chikki before and they are not my favourites. Sesame & Chocolates balls has been tried out for the first time with the intention to clear my fridge before I head start out on my travel. This recipe seems to have become an instant hit with me and hubby.
Wish you all Merry Christmas!!!
Sesame & Chocolate balls is my submission to this month's Monthly Mingle - Chocolate Extravaganza hosted by Ria's Collection and What's for lunch, Honey?
Santa greeted me first by saying Namaste, when I visited him in 2009 in Rovaniemi (Finland), Santa's official address. The Santa park has it's own post office from where you can post greetings to your loved ones sitting anywhere in the world. Rovaniemi is the land of reindeer and yes I got to try out reindeer meat with wild berries and I know I sound like a carnivore now....
This Christmas, I'm remembering my wonderful holiday and would like to share some of my happy times!

That's ME with Santa

Reindeer meat served with wild berries

All smiles with Lapish hospitality
No...wait! I'm not done yet....
I would also like to share with you a double treat of sweets that I made from sesame seeds that I received from iherb, for being selected as one of the winners among ten in SOS Challenge in the month of October, hosted by Diet, Dessert & Dogs and Affairs of Living.I'm heading home for this holiday season to Bangalore and looking forward to some travelling and exploring new recipes.Since it's Christmas time and you would want to gift some cookies, cakes or nibbles and I have come up with two easy to make recipes that would be easy to pack and can last up to a week even without refrigerating. So here it goes...

Sesame Chikki (Til ke Chikki)
4cups of sugar
1cup hulled sesame seeds
1tsp lemon juice
2tsp cardamon powder
Heat sugar in a pan and just when it's melted and before it's crystallizes, add lime.Once the sugar is fully melted, add sesame seeds, cardamon powder and turn of the gas. Mix well. Grease back of a plate or tray and spread the prepared mixture while hot. Allow it to set for an hour. After an hour, you will be
able to break the pieces easily. Break them into desired sizes and store them in an air tight container. I got about 30-35 medium sized pieces.

Sesame & Chocolate Balls
2cups hulled sesame seeds
1cup dessicated coconut
4tbs butter/ghee
1/2 cup honey
2tsp cardamon powder
1tbs raisins
1tbs cashew
50gms dark chocolate

Mix all the dry ingredients except for the chocolate in a bowl and mix well. Make small balls and keep them aside. Melt the chocolate in a bowl (microwave it) and dip the balls one by one, until it is fully covered with chocolate. I prefer to have a thin layer of chocolate rather than thick one. Allow it to dry and refrigerate for an hour. Store them in airtight containers either at room temperature for a week or refrigerate until they can last. I got about 25 pieces.

My tastebuds: I've had sesame chikki before and they are not my favourites. Sesame & Chocolates balls has been tried out for the first time with the intention to clear my fridge before I head start out on my travel. This recipe seems to have become an instant hit with me and hubby.
Wish you all Merry Christmas!!!
Sesame & Chocolate balls is my submission to this month's Monthly Mingle - Chocolate Extravaganza hosted by Ria's Collection and What's for lunch, Honey?
Friday, December 17, 2010
Some Smoothie?

It's winter and would you like to have some....
I think Smoothie of any fruit or flavour is one drink which can be consumed in all seasons; the best part is that you can even drink it at room temperature. This is my third post this month with strawberries and some how I don't seem to get enough of them this winter.I seem to enjoy them more in the morning and it does make my day :)
1 cup pumpkin purée (boiled & blended to a fine paste)
2 cups strawberries
1cup vanilla or plain yogurt
1tsp cinnamon powder
2tbs sugar (add more if you like yours sweeter)
some cinnamon powder for dusting & strawberry for garnish
Blend all the ingredients in a blender with some ice if you prefer. I like my strawberries to be huge chunks of pieces; you can blend them however you like.Serve cold or at room temperature in individual glasses, garnished with some strawberries and dusted cinnamon powder.Serves 2.

This is my submission to this month's Healing Foods - Winter Squash (pumpkin), hosted by the taste space and Siri's Corner.
Thursday, December 16, 2010
Feed a child and save hunger!

(source: akshayapatra.org)
During our darshin to the temple; one of the Iskcon representative came up to my Father and requested him to take some time off and explain to him about their new programme called mid-day meals for school children(that was the time when it first started in Bangalore). My father heard him out completely (now you have their website to tell you what exactly they are doing) and decided to contribute. Since then my father has been contributing in the name of the entire family.
Mid-day meals today feed 120million children and is still growing.The food is prepared in extreme hygiene condition; with centralized and decentralized kitchen (cooking activity takes place in an area close to school and the best part is that the women who cook are cooking for their own children).They have two menu set in for South Indian meal - consisting of rice, sambar and curd and North Indian meal - consisting of roti, sabji and rice.For more information on decentralized kitchen click on the video below.
You must be wondering how will your contribution/donation help....
- avoid classroom hunger,
- increase school enrolment,
- increase school attendance
- improve socialization among castes
- address malnutrition &
- empower women through employment
(Source: akshayapatra.org)
Let us all take part and contribute in helping the children.

(source: akshayapatra.org)
Tuesday, December 14, 2010
What do you do with leftover cooked rajma (kidney beans) water?
It's winter and all you want is a nice hot bowl of soup or rasam.Why not make some hot and spicy rasam with the left over rajma water. It has a nice thick consistency; good enough to use it for soups and rasam.
Why not make some hot rasam for this winter!The Indian spices and the tangy tamarind taste can really help your senses open out....

2cups rajma water
1tbs refined/ground oil
2 nos garlic cloves, crushed
2-3nos curry leaves
2tbs finely chopped onions
2tbs finely chopped tomatoes
1tsp mustard seeds
1/2 tsp pepper powder
1tsp jaggery powder
1tbs tamarind soaked in about 1/4 cup of warm water for 20minutes
salt to taste
Heat oil in a pan and add mustard seeds and curry leaves. Once the seeds and the leaves have popped and crackled, add onions and crushed garlic. After the onions have cooked and are soft, add tomatoes and cook until soft. Add rajma water, salt, jaggery,tamarind and let it boil for about 10 minutes. Garnish it with fresh cilantro and serve with rice or just drink it up! Serves 2.
My tastebuds: The rajma water adds a surprisingly different and a distinct flavour.
This is my submission to this month's MLLA #30, hosted by Mharo Rajasthan and The Well Seasoned Cook, to Complete my thali, hosted by Enveetu Kitchen and Joy of Cooking and to Souper Sundays hosted by Kahakai Kitchen.
Why not make some hot rasam for this winter!The Indian spices and the tangy tamarind taste can really help your senses open out....

2cups rajma water
1tbs refined/ground oil
2 nos garlic cloves, crushed
2-3nos curry leaves
2tbs finely chopped onions
2tbs finely chopped tomatoes
1tsp mustard seeds
1/2 tsp pepper powder
1tsp jaggery powder
1tbs tamarind soaked in about 1/4 cup of warm water for 20minutes
salt to taste
Heat oil in a pan and add mustard seeds and curry leaves. Once the seeds and the leaves have popped and crackled, add onions and crushed garlic. After the onions have cooked and are soft, add tomatoes and cook until soft. Add rajma water, salt, jaggery,tamarind and let it boil for about 10 minutes. Garnish it with fresh cilantro and serve with rice or just drink it up! Serves 2.
My tastebuds: The rajma water adds a surprisingly different and a distinct flavour.
This is my submission to this month's MLLA #30, hosted by Mharo Rajasthan and The Well Seasoned Cook, to Complete my thali, hosted by Enveetu Kitchen and Joy of Cooking and to Souper Sundays hosted by Kahakai Kitchen.
Thursday, December 9, 2010
I started my day with delicious Strawberry Pancakes

Chef Christian Faure, M.O.F (Master Craftsman of France), was recently in Mumbai and I happen to stumble upon a very handy tip for strawberries: he says that if strawberries are placed in the sun for 10 minutes; the warmth helps out to bring the flavour of the fruit. I haven't tried it though but would love to hear from you if you noticed any change :)

1 1/2 cup all purpose flour
2 egg whites
2tbs honey
1 cup milk
2cups strawberries
1/2tsp salt
1tsp baking powder
1tsp vanilla extract
2tbs butter
maple syrup/honey, powdered sugar & some strawberries to serve
Mix the dry ingredients in a bowl and keep it aside.
Take the wet ingredients in another bowl and mix well. Slice thin slices of strawberries.
Mix both the wet and the dry ingredients together slowly. Add the sliced strawberries and stir very gently.
Grease the skillet lightly, and drop about 1/4 cup of the mixture. Spread it lightly.You will see bubbles popping on the surface and will also see the edges done. It's time for you to flip the pancakes with the help of a spatula and cook the other side as well.

Serve your hot pancakes with maple or honey or strawberry syrup, powdered sugar and some sliced or whole strawberries. I got about 4 pancakes.
My tastebuds: It definitely made my day and added a sweet fragrance to my morning.
This is my submission to Blog Bites 9:The Holiday Buffet, hosted by One Hot Stove.
Tuesday, December 7, 2010
Spinach, Strawberry & Ricotta Cheese Salad
Strawberries are in season!!! I love strawberries for it's sweet flavour and it's gorgeous colour .You will definitely be seeing a lot more posts from me this strawberry season.
Since they are very perishable, strawberries should not be washed until right before eating or using in a recipe. Do not remove their caps and stems until after you have gently washed the berries under cold running water and patted them dry. This will prevent them from absorbing excess water, which can degrade strawberries' texture and flavour.
This salad is the easiest salad that I've ever tried and it's not only tasty but also gorgeous looking too.

20 big sized leaves, washed, patted dry
20 pieces strawberries cut in halves (fresh or frozen)
ricotta cheese for garnish (I used home-made)
for the dressing
2tbs olive oil
1tbs red wine vinegar
1tsp lime juice
2tbs honey
1tsp cinnamon powder
salt to taste
Mix all the ingredients for the dressing and refrigerate it for an hour before serving.
Break spinach leaves into desired sizes and place them in a serving plate or a salad bowl. Arrange the strawberries and ricotta cheese on the bed of spinach if using individual plates or just toss all of them together in a salad bowl. Drizzle it with the prepared dressing and serve at room temperature. Serves 2.
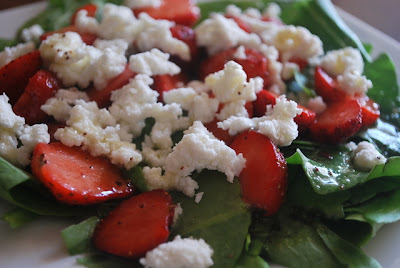
My tastebuds: It's a great combination and the flavours blend in perfectly. A must try this strawberry season!
Tip: Dry cottage cheese may be substituted for ricotta, but the flavour will be milder and a bit saltier. You may wish to smooth the cottage cheese by putting it through a blender with 1tbs skim milk.
This is my submission to this week's Souper Sundays, hosted by Kahakai Kitchen, to Gulten-Free Holiday, hosted by The Whole Gang, to this month's Only Greens, hosted by Sara's Corner and Foodelicious and to Hearth and Soul, hosted by Girlichef.

Since they are very perishable, strawberries should not be washed until right before eating or using in a recipe. Do not remove their caps and stems until after you have gently washed the berries under cold running water and patted them dry. This will prevent them from absorbing excess water, which can degrade strawberries' texture and flavour.
This salad is the easiest salad that I've ever tried and it's not only tasty but also gorgeous looking too.

20 pieces strawberries cut in halves (fresh or frozen)
ricotta cheese for garnish (I used home-made)
for the dressing
2tbs olive oil
1tbs red wine vinegar
1tsp lime juice
2tbs honey
1tsp cinnamon powder
salt to taste
Mix all the ingredients for the dressing and refrigerate it for an hour before serving.
Break spinach leaves into desired sizes and place them in a serving plate or a salad bowl. Arrange the strawberries and ricotta cheese on the bed of spinach if using individual plates or just toss all of them together in a salad bowl. Drizzle it with the prepared dressing and serve at room temperature. Serves 2.

My tastebuds: It's a great combination and the flavours blend in perfectly. A must try this strawberry season!
Tip: Dry cottage cheese may be substituted for ricotta, but the flavour will be milder and a bit saltier. You may wish to smooth the cottage cheese by putting it through a blender with 1tbs skim milk.
This is my submission to this week's Souper Sundays, hosted by Kahakai Kitchen, to Gulten-Free Holiday, hosted by The Whole Gang, to this month's Only Greens, hosted by Sara's Corner and Foodelicious and to Hearth and Soul, hosted by Girlichef.

Friday, December 3, 2010
not so traditional Tomato & Onion Chutney
This recipe is adapted from my mom, who used to always make this and in no time my brother and I would finish it.This chutney can last for up to two days, on any travel journey even if it is not refrigerated .It has always been my favourite chutney and with very little effort, it can be a very good accompaniment for any main dish.

2cups chopped tomatoes
2cups chopped onions
2tbs refined/groundnut/olive/mustard/sesame oil
4 pieces of green chillies, finely chopped,
1 inch ginger piece, finely chopped
1/2tsp turmeric powder
1 tsp coriander powder
1/2tsp garam massala
salt to taste
Heat oil in a pan and add chopped onions and ginger. Add tomatoes and chillies, when the onions turn transparent.Add turmeric, coriander and 1/2 cup of water and cook on low flame for 20 minutes. After 20 minutes, add salt and garam massala and cook for about 5 minutes, until all the ingredients are mixed well and all the water has been evaporated. Serve with parathas. I served mine with Raw Papaya Parathas.
The quantity specified here, serves 2. You can double it as per your requirement and refrigerate for 4-5 days. They taste better by the day :)
My tastebuds: surely a winner!
This is my submission to this week's Weekend Herb Blogging, hosted by The Crispy Cook and Cook Almost Anything.

2cups chopped tomatoes
2cups chopped onions
2tbs refined/groundnut/olive/mustard/sesame oil
4 pieces of green chillies, finely chopped,
1 inch ginger piece, finely chopped
1/2tsp turmeric powder
1 tsp coriander powder
1/2tsp garam massala
salt to taste
Heat oil in a pan and add chopped onions and ginger. Add tomatoes and chillies, when the onions turn transparent.Add turmeric, coriander and 1/2 cup of water and cook on low flame for 20 minutes. After 20 minutes, add salt and garam massala and cook for about 5 minutes, until all the ingredients are mixed well and all the water has been evaporated. Serve with parathas. I served mine with Raw Papaya Parathas.
The quantity specified here, serves 2. You can double it as per your requirement and refrigerate for 4-5 days. They taste better by the day :)
My tastebuds: surely a winner!
This is my submission to this week's Weekend Herb Blogging, hosted by The Crispy Cook and Cook Almost Anything.
Sunday, November 28, 2010
Orangettes

My sweet craving since my last post seems to be continuing......
Orangettes are strips of candied orange peel dipped in dark chocolate.This is a great recipe and makes your house smells good too.They can be tedious to make but I can assure you that the hard work does pay off; in a very sweet and fruitful way.....
4 oranges
6tbs sugar
4 cups water for sugar syrup
250gms dark chocolate

Using a medium size pot, place the peels in boiling water and blanch them for a few minutes. Rinse the peels, and repeat this process a second time (it's best to use cold water again for the second time to repeat the process). This is done to remove the bitterness of the peels.


Store and refrigerate orangettes in an airtight container or pack them up to gift your loved ones. This recipe serves about 30-40 orangettes.
This recipe is adapted from here.
My tastebuds: I loved them! Even now I'm biting into one while writing this post.
This is my submission to Gulten-Free Holiday, hosted by Tasty Eats At Home, to Choco-Delite's Event, hosted by Taste Buds, to AWED - French, hosted by Priya's Easy n Tasty Recipes and Chefinyou and to The Chocolate Fest, hosted by Cook-curry nook.

Friday, November 26, 2010
Sweet Potato Halwa
What do you do when you have a sweet craving, do you give in? I know eating fruits is better than eating chocolates, cakes, muffins....but there are times when you really want more than a fruit to satisfy you.....I was reading an article on how not to give into sweet craving and one of the tip that it shared was to read the label on the packet, the label does make you realise the amount of sweet it contains and that can help you stay away from it....
Hmmmm makes me wonder whether it will really work; especially at a time when you have only sweet on your mind. I did go through this phase a few days back and I thought of making something home-made and at the same time something healthy too...Sweet Potato Halwa is definitely lite and does satisfy your sweet tooth....well it did mine :)

4 cups grated sweet potato (cleaned, pealed and not cooked)
1/2 cup black jaggery (you can add more if you like yours sweeter)
2tbs ghee/coconut oil
1tbs raisins
2tbs cashews
1tbs cardamon powder
1tbs desiccated coconut for garnish
Heat oil/ghee in a pan and add the grated potato. Constantly keep stirring on medium flame, until they have turned golden brown. Add jaggery, raisins, cashews, cardamon and keep stirring on medium flame, until the halwa is cooked. Garnish it with desiccated coconut and serve hot or at room temperature. Serves 4.

My tastebuds: Jaggery gives a strong flavour and it's hard to say whether you are actually eating sweet potato.
This is my submission to this month's, SOS Kitchen Challenge, hosted by Diet, Dessert and Dogs and Affairs of Living.
Hmmmm makes me wonder whether it will really work; especially at a time when you have only sweet on your mind. I did go through this phase a few days back and I thought of making something home-made and at the same time something healthy too...Sweet Potato Halwa is definitely lite and does satisfy your sweet tooth....well it did mine :)

4 cups grated sweet potato (cleaned, pealed and not cooked)
1/2 cup black jaggery (you can add more if you like yours sweeter)
2tbs ghee/coconut oil
1tbs raisins
2tbs cashews
1tbs cardamon powder
1tbs desiccated coconut for garnish
Heat oil/ghee in a pan and add the grated potato. Constantly keep stirring on medium flame, until they have turned golden brown. Add jaggery, raisins, cashews, cardamon and keep stirring on medium flame, until the halwa is cooked. Garnish it with desiccated coconut and serve hot or at room temperature. Serves 4.

My tastebuds: Jaggery gives a strong flavour and it's hard to say whether you are actually eating sweet potato.
This is my submission to this month's, SOS Kitchen Challenge, hosted by Diet, Dessert and Dogs and Affairs of Living.
 Sweet Potato
Thursday, November 25, 2010
Beet Puri
We have had all kinds of puris..haven't we? How about some beet ones...I tried these first from a lady, who was my daily tiffin provider for lunch; a common practice in Mumbai to carry home-cooked tiffin/lunch to work.Though I've never had this in my packed tiffin; I happen to get a taste of it from her kitchen. I really liked the idea of adding beet in puris and visually they look great. It's definitely an eye catcher on your dining table.

2cups wheat flour
1cup beet purée (boiled & puréed in a blender)
2tbs roasted sesame seeds
salt to taste (optional)
any refined or groundnut oil for frying
Take flour and mix beet purée make a soft dough. I opted out the option of adding salt as beet already contains sodium and I prefer to use less salt in my cooking.Once you've got the dough to the right consistency, add 2 tbs of oil and continue to knead. The dough will become silky in texture. Cover with a damp cloth now and keep aside in the refrigerator for 20 minutes.
Remove from refrigerator and divide the dough into golf ball-sized portions.Roll round balls and roll it into a circle using a rolling pin (roll each ball into a 5" circle). For convenience, roll out as many Puris as you like, stacking them, ready to cook with a layer of cling film between each Puri.
Roll into a circle of desired thickness and take care not to make it too thin. Heat the oil for deep frying in a thick-bottomed flat pan on a medium flame.
Deep fry the Puris one at a time, pressing very gently on each side with a slotted spoon. This will help the Puri to puff up! Fry one the first side till golden then turn over and fry the same way on the other side. Drain on paper towels and serve hot.
Serve them with any vegetarian curry or your favorite pickle. I served mine with Peas curry (will share the recipe soon). I got about 15 puris.

A handy tip: For foods like gujias, samosas or puris, that are made of or have an outer covering/wrap of flour-dough and need deep-frying, prepare in advance and chill them in the refrigerator. This way when you do fry them they will consume less oil and therefore have a lower fat content!
My tastebuds: I've always eaten beet fresh and never in any fried form. I liked the combination of the sesame seeds and beet. Few bites of the seeds, gives it a nice flavour.
This is my submission to this month's event, Food Palette - Red, hosted by Torview and to Complete My Thali, hosted by Torview and Joy of Cooking.

1cup beet purée (boiled & puréed in a blender)
2tbs roasted sesame seeds
salt to taste (optional)
any refined or groundnut oil for frying
Take flour and mix beet purée make a soft dough. I opted out the option of adding salt as beet already contains sodium and I prefer to use less salt in my cooking.Once you've got the dough to the right consistency, add 2 tbs of oil and continue to knead. The dough will become silky in texture. Cover with a damp cloth now and keep aside in the refrigerator for 20 minutes.
Remove from refrigerator and divide the dough into golf ball-sized portions.Roll round balls and roll it into a circle using a rolling pin (roll each ball into a 5" circle). For convenience, roll out as many Puris as you like, stacking them, ready to cook with a layer of cling film between each Puri.
Roll into a circle of desired thickness and take care not to make it too thin. Heat the oil for deep frying in a thick-bottomed flat pan on a medium flame.
Deep fry the Puris one at a time, pressing very gently on each side with a slotted spoon. This will help the Puri to puff up! Fry one the first side till golden then turn over and fry the same way on the other side. Drain on paper towels and serve hot.
Serve them with any vegetarian curry or your favorite pickle. I served mine with Peas curry (will share the recipe soon). I got about 15 puris.

My tastebuds: I've always eaten beet fresh and never in any fried form. I liked the combination of the sesame seeds and beet. Few bites of the seeds, gives it a nice flavour.
This is my submission to this month's event, Food Palette - Red, hosted by Torview and to Complete My Thali, hosted by Torview and Joy of Cooking.
Subscribe to:
Posts (Atom)
